|
|
|
Guide to ripping audio from the DVD of Everything
to Everyone on Windows
(Click here for the Mac version of this gude)
In this guide, I will teach you how to rip audio from the E2E DVD, not only to make CDs/mp3s of the bonus tracks, but also to make your own CD/mp3s of the main tracks with higher quality than the official E2E CD.
Note that this guide is not designed for novices. This is a fairly involved process. It's not "rocket surgery," but it might scare off the squeamish.
For those of you who want an easier solution and don't care so much about audio quality, you can use a program like Total Recorder. This program allows you to basically just play the DVD and hit the record button. Because this process involves going from digital to analog and back to digital, the quality won't be as good, but a lot of people probably won't even be able to tell the difference. If this sounds good to you, go for it.
If you're like me, you want to get the best quality possible, even if it takes a little less work. If that's you, this guide is for you.
Why is the quality better than the retail CD? It's still just a CD.
You may be wondering if it's worth going through all this hassle for tracks you already have on the CD. If you care about audio quality at all, it's definitely worth it. "How can this be?" you ask. You're right to be skeptical. After all, a CD can't take advantage of all the DVD-Audio goodness. While it's true that your new CD won't be as good as DVD-Audio, and it won't even be as good as the AC3 DVD-Video tracks we're ripping in this guide, it will produce results noticably better than what the record label put out on the retail CD. This is due to a few factors:
What You Need:
The Main Tracks
We'll start by ripping the main tracks and "Yes! Yes!! Yes!!!" If you're only interested in the acoustic tracks, you can skip ahead, but I recommend you read through this section, because I will assume you did this part first.
1. Decrypting the DVD
Due to the encryption on a DVD, you can't just copy the files onto your hard drive. For this, we need to use SmartRipper. Put the DVD in your DVD drive and load up the program.
Select File mode and deselect all the files, except VIDEO_TS.VOB. Also, choose the target folder where the file will be copied to. Make sure there's enough space available.
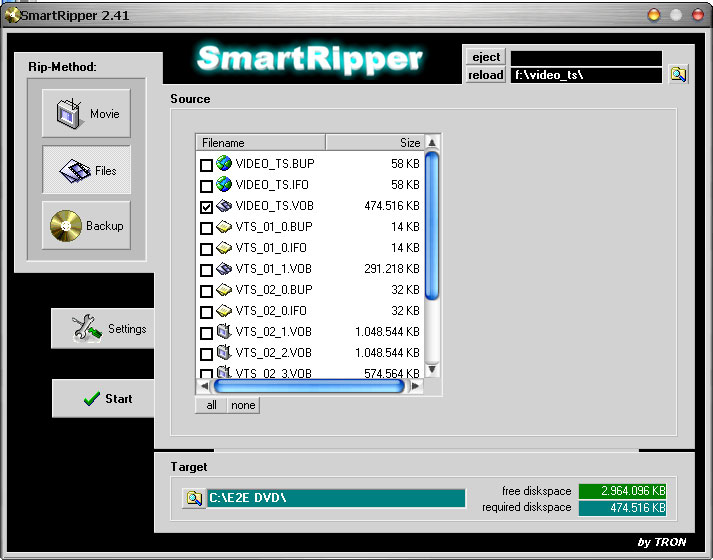
When you're ready to begin, click the "Start" button, and let the program do its thing.
2. Stripping (Demuxing) the VOB
The VOB file you ripped from the DVD contains all sorts of videos, menus, and other sounds we don't need. We will use VOBRator to strip the needed AC3 files from the VOB.
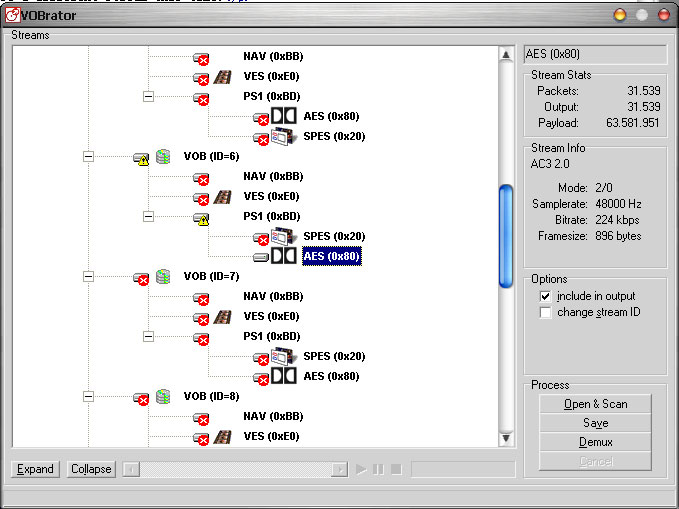
Click the "Open & Scan" button and open the VOB file we created in the last step. The program will open the file, scan it, and present you with a tree showing all the available streams in the file.
By default, all streams are selected. Select "VIDEO_TS.VOB" at the top and uncheck "include in output" on the right to quickly deselect everything. Now, we just re-enable the two streams we are interested in, as circled in the image below:
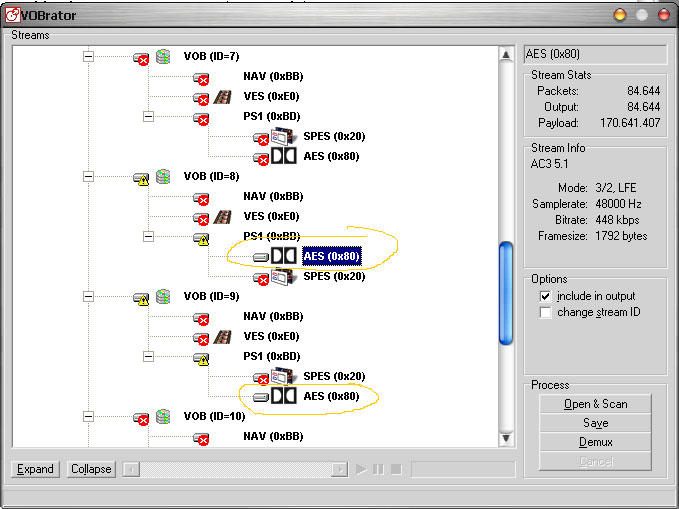
Click the "Demux" button, choose a destination and name (I used E2E). A few seconds later, you should have two ac3 files.
3. Converting the AC3
Though these AC3 files may be playable in your computer, you're probably going to want to convert them to wave files next. HeadAC3he provides a simple way to do this. Launch the program and click the "Source File" button, and choose one of the AC3 files.
For best quality, use "two-pass float" mode. If disk space is at a premium, "dumb" mode is slow, but uses less space. "Hybrid" gives lower-quality results, but does so quickly and with minimal disk space requirements. Normalize to 100%.
You may want to resample to 44.1 kHz for compatability reasons. Some mp3 players can't handle 48 kHz files. I didn't resample, for optimum quality. CDs require 44.1 kHz files, but your CD burning program should handle the conversion if you don't do it here.
Click the "Options" button and then click the "2ch" button. "Surround 2" means that the file will be encoded in Dolby Pro Logic II. When played back in a PLII system in movie mode, much of the 5.1 surround sound will be preserved. It is also backwards-compatible with Pro Logic I and stereo systems, so don't worry if you don't have Pro Logic II.
You'll probably want to change the outputs on the left and right channels to "no" DRC. DRC is dynamic compression, which makes loud parts quieter and quiet parts louder. I'd prefer to keep my music pure, but if this appeals to you, have at it.
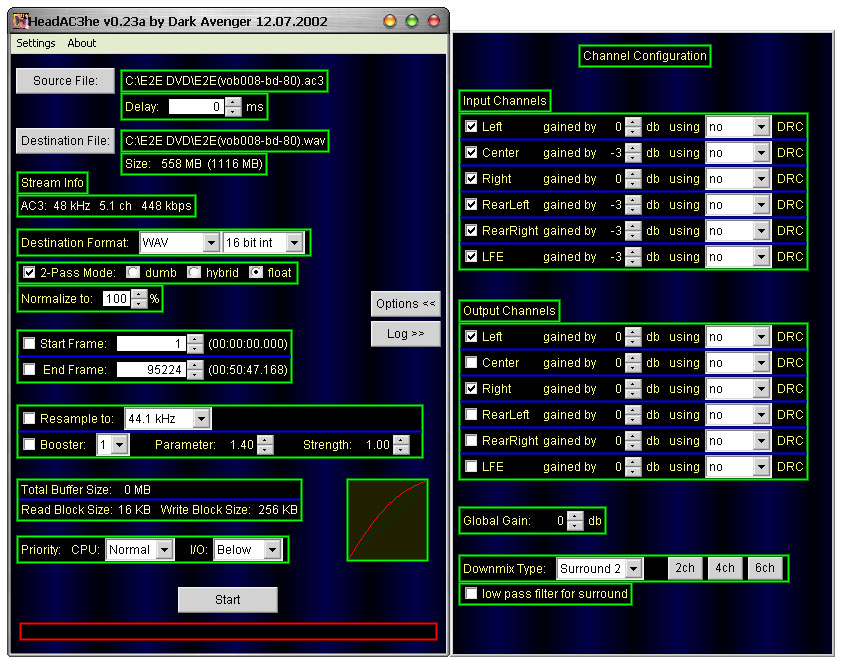
Press the "Start" button to do the conversion. Rinse and repeat with the other AC3 file.
4. Splitting the big WAV file into tracks
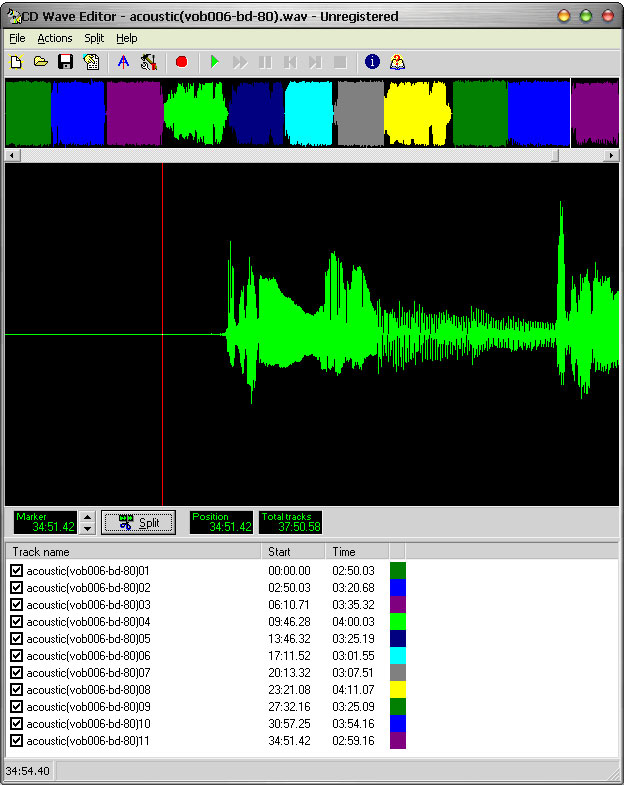
At this point, you have two wav files. One is the song "Yes! Yes!! Yes!!!" and the other is all the other songs. You could stop right here, but it's inconvenient to not have the tracks separated. CD Wave Editor is a shareware program that lets us pretty-easily split the wav. Launch the program and open the big wav file. On the top, you will see a small waveform of the whole file. Below that is a larger, scrollable waveform of the part of the wavform currently selected. What you want to do is go through the file, finding the parts where one song ends and another begins. At appropriate points, click the "split" button to indicate where one track should end and the next should begin. Be sure to listen to what you're doing, because sometimes there are really soft parts that don't show up visibly on the waveform. When you're all done, it should look something like this:
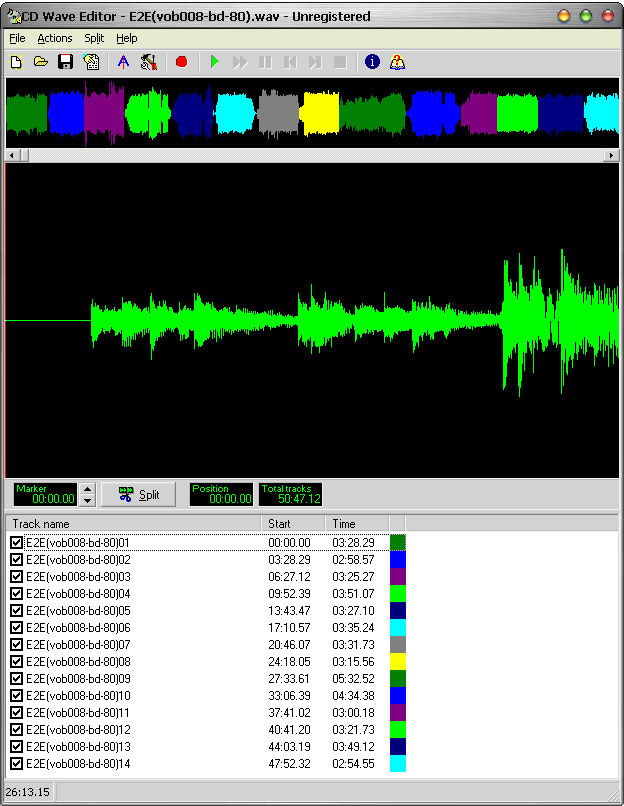
You could probably use the times I used, if you trust I did a good job.
I recommend you save a cue sheet. This will let you retrieve these values later. You could also burn a CD with the cue sheet, but that pretty much limits you to these tracks in this order.
To make mp3s and give us flexibility when burning CDs, go to "save" in the file menu and choose a directory. This will create 14 smaller wave files, one for each track.
5. Burning an Audio CD
At this point, I used Nero to burn an audio CD with the original 14 tracks plus "Yes! Yes!! Yes!!!". I stuck "Yes! Yes!! Yes!!!" in as the second track, but you can use any good burning program and choose whatever track order you want. You could also hold out to mix some acoustic tracks on your CD.
6. Encoding MP3s
For the best possible mp3s, there's no other choice than LAME. If you feel comfortable doing things with the command prompt, be a man and do it. For the rest of you, I've heard good things about RazorLame, so hold on a virtual minute while I go download that. Well, you don't have to; you can just keep reading like I never left.
Okay, I'm back. First thing you have to do is tell RazorLame where you extracted LAME to. Go to "Options" in the edit menu to set this. Now, we need to set up the encoding options. Click the "LAME" button and go to the "Expert" tab. Check the box for "Only use custom options" and in the "Custom options" box, enter one of the following commands:
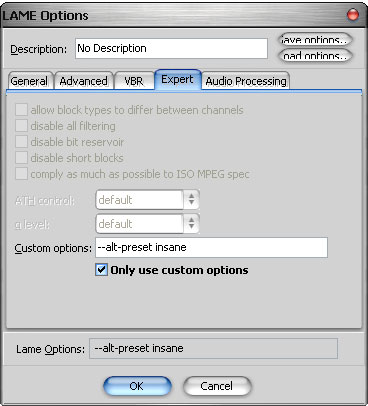
Click OK, drag the wav files into the program, and click the "Encode" button. You've got near-perfect mp3s! You'll probably want to rename the files and set up the ID3 tags. MP3/Tag Studio or similar programs can do this. This part isn't critical, so figure it out on your own. :-)
If you want, you could make Ogg Vorbis files or whatever your preference instead of mp3s. For me, mp3s get the job done beautifully, while being playable in all my machines and portable players.
The Acoustic Tracks
For the most part, ripping the acoustic tracks is just like what we did above, but there are a few differences. In this section, I'll focus mainly on what should be done differently from above.
1. Decrypting the DVD
Lucky us! It's in the same file as before. I guess I could have done this guide more concisely, but I'm not going back now. If you already deleted VIDEO_TS.VOB, just repeat step 1 from above.
2. Stripping (Demuxing) the VOB
Same as before, but we use a different stream this time.
2. Converting the AC3
This is pretty much the same as last time. The only difference here is that the tracks are only in stereo, so all that stuff about encoding for Pro Logic II doesn't apply.

3. Splitting the big WAV file into tracks, Burning CDs, and Encoding MP3s
This is the same deal as before. Here's how I split the files:
I used the CUE sheet to burn this time, because I didn't change any of the track order. Save the individual WAV files to rearrange tracks on your CD and/or to make mp3s. Have fun!